Friday, December 5, 2014

Manifold studs

I needed to replace a few exhaust manifold studs so I started looking online to see if I can find the right m8-1.25 double ended studs for the Fiat 124. I found quite a few automotive specialists selling some very expensive stuff. About $4/stud+nut. Which I thought was just ridiculous so with a bit of perseverance I eventually found an affordable source for manifold studs.

The part is Dorman #03411.You get 10 studs and 10 self-locking flange nuts. And it only costs around $8.00 for the set.


The dimensions of the stud are as follows;

Inside threads    = 20mm
Shoulder            = 10mm
Outside threads = 20mm
Hex (5mm) head = 6mm
Total Length      = 56mm

And the flange nut is 10mm long and has a 13mm hex head.


Apparently the intended application is for Ford 2004-97, Lincoln 2002-98 V8 engines. But it works perfectly on the Fiat 124 engine.

The stock exhaust manifold mounting face is 15mm thick and the intake manifold is 25mm. So the kit should work fine on the exhaust side but is too short for the thicker intake manifold.

Thursday, October 2, 2014

All metal clutch release bearing

I purchased a clutch release bearing from AutoRicambi and later realised it was made of plastic whilst the original was an all metal construction.

I set out looking for an all metal bearing and found that International-Auto sells the all metal ones.

The part I received is an CORAM C0013. I also found that it interchanges with quite a few different part numbers.


VALEO - 264969
SACHS - 1850282127
TIMKEN - FI1709C
FIAT - 5954175
FIAT - 4409889
FIAT - C4901
FIAT - 5888486
FIAT - 4156829
FIAT - 4237218
FIAT - 4316750
FIAT - 4327218
FIAT - 4207838
FIAT - 4156828
FIAT - 4305532


Sachs actually puts it into a complete clutch kit KF292-03.

Thursday, August 28, 2014

Timing belt tensioner

Tricky thing to install but managed to get the spring installed using a set of pliers. Interesting to note that the new belt I got from AutoRicamb was longer than the old belt I took off. Once on the tensioner you don't notice it much but it was interesting to see nonetheless.


Sunday, August 17, 2014

Camshaft Housing

Starting to look like an engine again now that the camshafts have been installed.


Tuesday, August 12, 2014

Cylinder Heads

I got the heads back from the machinist and they look great! Makes me want to send him the cam boxes too as they look really horrid in comparison now.

Interestingly enough while installing the head gasket from the engine gasket set I got (branded "Guarnitauto"), I noticed that one water hole in the block does not exist on the cylinder head. The head gasket seals the hole in the block too so I suppose that was how it was meant to be for the 1608cc.

Before installing the head I got to try out my new dial gauge to set TDC. Which on something like this 4-cylinder is completely unnecessary. I could probably "feel" TDC by moving the crank by hand and be within 2 degrees.

I also needed to torque down the auxiliary shaft pulley. Which was a bit tricky since I couldn't find anything to hold the aux shaft. I had an old oil pump I thought I could use by jamming the gears but I was worried it would strip the teeth in the drive gear/bush. Eventually I reverted to just using some bailing wire through the two timing holes. This was sufficient to get the 58lbs needed for the pulley.

And here's a tip for replacing the water pump, replace the bolts too! I snapped one in the block but I was lucky that I had cleaned the threads first so it came out very easily. There are 4 m6-1.0 bolts. Two 25mm and two 45mm.

Saturday, August 2, 2014

Pistons Installed

Lots of cleaning, oiling, more cleaning and more oiling. The pink stuff is Redline assembly lube.

Monday, July 28, 2014

Painting the Block

Got the engine block back from the machinist after he cleaned it up, honed the bores and replaced a couple of freeze plug (not sure why he didn't replace all of them). I used a wire wheel with an electric drill and knocked off the loose rust and then washed the block with light soapy water. I then used some wax & grease remover in preparation for paint but noticed that I was still getting rust dust from the block once it had dried so I did another cycle of wash and prep.

I used Duplicolor Engine Primer (DE1612) and then used Cast Coat Iron (DE1651). This is a decent alternative to the original colour which is a dark machine grey. Some of its faded remnants can still be seen in the photo below. I kept colour coating it until I ran out of paint. Which ended up being around 5 coats.

 
I will let it cure over night and then begin washing the block again in preparation for reassembly.

Friday, July 18, 2014

Bottom End

The discolouration on the crank webs are due to heat treating done to the crankshaft for hardening.

Main bearings look like they're done. Connecting rod bearings look perfect. Bores look OK.


Friday, July 4, 2014

Engine with Transmission Removal

I needed to replace the clutch and there were a lot of oil leaks so I decided to pull the engine and spruce it up a little.

I followed the instructions in the Haynes manual mostly but I also removed the alternator and intake manifold for extra visibility.

I used the factory lifting eye on the passenger's side cam cover and I used one of the intake manifold studs on the other side. I know some people like to use a cylinder head bolt but that just sounds ridiculous to me. If it were a rare Ferrari V12, would you remove a cylinder head bolt just to remove/install the engine in the car? No. So why should it be any different for any other car.

I didn't remove the shifter extension housing. I used the 1 ton setting on my 2 ton crane and used a leveler. I had the front of the car on the ground and the rear of the car raised slightly using axle stands.

Was a pretty easy job overall. Felt almost like cheating compared to some of the other cars I've worked on.


Lots of clean up to look forward too :)

Saturday, June 28, 2014

Removing Shifter Lever Extension

The trick to this is not to try and pull up on the lever while wedging the clips closed. Instead, put a small screw driver between two of the ears and pull the clip down while holding the lever.

Sunday, May 25, 2014

Repairing Top Catch Threads

One of the screws on the driver's side top-catch was missing so I took off the other screw and measured it to be an m5-0.8 x 16mm. I bought 4 new replacements but on the driver's side they wouldn't go in. It looks like the previous owner once cross threaded something in there and has either damaged the threads or left broken threads in the frame. This could have turned into a major repair but luckily I ran an m5-0.8 tap through the holes and it cleared everything up.

Oil Filter

For anyone interested, the correct oil filter for a 1971 Fiat 124 Spider 1600cc (and likely many others) is a Bosch #3402. This cross references to an AC Delco #5579164. Which is used on GM cars.


Oil Pressure Sender

The oil pressure sender had been leaking so I decided to change it with a new one from AutoRicambi.

Getting the old one off wasn't too difficult but having a stubby 22mm wrench (old sender) and a stubby 17mm wrench (new sender) will make the job easier.

The car never registered great oil pressure to begin with but after changing the switch its reading a steady 0. Taking a closer look at the new sender, you can see that the bore is much smaller than that of the old sender. This is likely the reason for the difference in readings. I'll hunt down the correct replacement later but in the meantime this one has stopped the leak.

Saturday, May 17, 2014

Transmission Oil Change

After two days of fighting with one of the nuts on the transmission cross member with a small piece of hacksaw blade trying to cut it off without damaging anything, I finally got the damn thing off today.

I needed to lower the transmission a little to get better access to the oil fill plug because trying to get it off with a 17mm spanner started rounding off the corners. I needed to put a proper 6 point socket on it and lots of torque.


I once bought a set of wobbly extensions by mistake and was rather annoyed at myself for not looking at them properly when buying them.

But today that all changed when they turned out to be the perfect tool for the job. Check out that clearance! Perfectly flat on the socket and just cleared the tunnel. A regular U-joint style extension would not have cleared.

There was quite a bit of metal fuzz on the drain plug. I would think on a manual gearbox having a magnetic drain plug wouldn't be of much use compared to an automatic transmission where the tolerances for dirt are much much smaller. Going to take the cover off and put a new gasket as well.

As far as oil goes I know a lot of people like to use the GL1 from Napa, but the idea of using some off brand magic gear oil from Napa for a 40 year old specification is just totally ridiculous to me. I'm not going to do that. I'm going to use Valvoline VR1 SAE50 motor oil. For a splash lubricated gearbox that is not compatible with GL4 or GL5, I think this is the best solution.

I got about 1 quart out of the transmission. I didn't drain the catchment area at the back because I didn't seem to have the right tools for the job. Got about 8 oz shy of 2 quarts into it.

Friday, May 16, 2014

Differential Oil Change

Tried to change the oil in the gearbox but there is no clearance to get a socket and wrench onto the 17mm fill plug and my spanner started rounding off the corners of the hex bolt. So I decided to lower the gearbox a little but got stuck with one of the transmission cross member nuts. Which just kept spinning without coming out. I'll need to cut it out so I gave up for the day and decided I'd do something easier like change the oil in the diff.

A little more than 1 quart of black goo came out and a little under 2 quarts of fresh Valvoline 80w90 gear oil went in. First time I've seen a magnetic drain plug for a differential.

Saturday, May 10, 2014

Transmission Mount

When doing the driveshaft rebuild I noticed that the transmission mount was quite perished and would need replacing. I ordered a new mount from AutoRicambi but found that the replacement was quite different from the one on my car.

The total length (longest dimensions) for my mount is only 4-5/8", whilst the AR mount is 5-1/2".
After a few trial fitments it became clear that this mount would just not work. The increased height brings the shifter extension housing too close to the transmission tunnel. 

So I did some research and Ramzi from AR explained that there were several sizes over the years and sent me the photo below.
I was determined to find the correct mount so I reluctantly called Vicks (as they listed it on their website) but they were out of stock of the shorter mount. InternationalAuto was the same story except they were waiting on an international shipment to arrive with no ETA as it needed to clear customs. I eventually found that Mr.Fiat had them in stock and so I paid their ridiculous price for one because I wanted to get the car on the road again without losing another weekend.

Here are the three mounts next to each other. From left to right; the old mount I took off the car, the new Mr.Fiat mount and lastly the AutoRicambi mount.
The photos may make it seem like my mount is shorter than the Mr.Fiat mount but they are so close its negligble.

Comparing the AutoRicambi mount with the MrFiat mount, the AR mount is obviously taller but is made of the same 1/4" thick steel as the original mount off my car. However, the actual rubber portion of the mount is very thin and can be easily flexed by hand. I bet I could tear it apart by hand. Whilst the MrFiat mount is made of a thinner 1/8" thick steel, the rubber portion is much beefier. It doesn't flex at all like the AR mount does.
And as you can see from the photo above (MrFiat left and AR right), there is quite a bit more rubber on the MrFiat mount compared to the AR mount.

So although I'm told that Fiat has superseded to a single size mount, if your car uses the shorter mount they are still available from a few vendors.

Saturday, May 3, 2014

Drive Shaft Rebuild

During a test drive I noticed a knocking sound from underneath the car. Sounded like a bad U-joint initially but was a bit loud. I thought if I'm going to replace a U-Joint I might as well rebuild the entire drive shaft with new flex disc and centre support bearing.

Removing the drive shaft wasn't difficult. I probably spent most of the day getting the car supported properly. I didn't even remove the hand brake mechanism. I just took off the springs and slipped the drive shaft down and out the front of the car.

When I separated the rear section of the drive shaft from the differential yoke I found that oil had accumulated inside. This apparently is a common problem with Spiders. The fix appears to just put some sealant in that area.


Removing the U-Joint yoke on the forward section of the drive shaft (in order to remove the centre support bearing) was a bit tricky. I really tried to figure out how I could do this without additional apparatus but I ended up having to bolt the flex disc spider on a piece of wood and then place the wood under the tire of the car in order to get enough torque on the nut without the shaft turning. The manual states to torque it down to 87 ft.lbs.

Once removed a gear puller made short work of taking off the yoke but the centre support bearing put up a good fight. There was quite a bit of corrosion on the shaft.

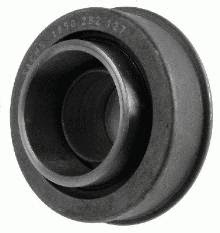
To install the new centre support bearing I found that a 24mm deep drive socket fit perfectly over the metal collar of the bushing, allowing me to hammer it down.

Using the same technique to remove the yoke nut, I torqued it down under the tire of the car.

I decided to replace the gearbox mount after seeing the bad rubber from underneath. I supported the gearbox using a floor jack, took the nuts off the bracket and then let the jack down a little to get enough clearance around the mounting studs. You have to be careful doing this because there is no rear engine mount. So if you let the gearbox drop too far you will hit the cylinder head against the bulk head. - not good.

Upon inspection of the mount I noticed it was really bad. The rubber had almost completely split. Same was the case with the flex disc/guibo/thing. It was lucky I decided to rebuild the drive shaft otherwise I wouldn't have seen how bad it was.

When I started to install the new mount I noticed that it was too tall. Not sure what's going on here. Need to do more research. UPDATE: The mount I purchased was from AutoRicambi and I am told it is custom made to be a one-size fits all part. Given the later cars did indeed use a taller mount this must be the reason for the compromise. Both Vick's and InternationlAuto list what looks like the correct part so I will likely buy one from them instead.

While there I noticed an oily mess just overhead from what looks like the shift lever socket cover. There also appears to be missing bolt/stud? on the top right of the housing. That's a bit worrying. UPDATE: This missing item is actually a reverse gear lock out stud. It prevents the driver from accidentally selecting Reverse gear.